
Stop Using AWS IAM users to login!
The Problem
There’s numerous ways for developers and engineers to log into their AWS cloud environment. Let’s be honest: Who has never seen this setup before or even used this one as part of your daily development routines:
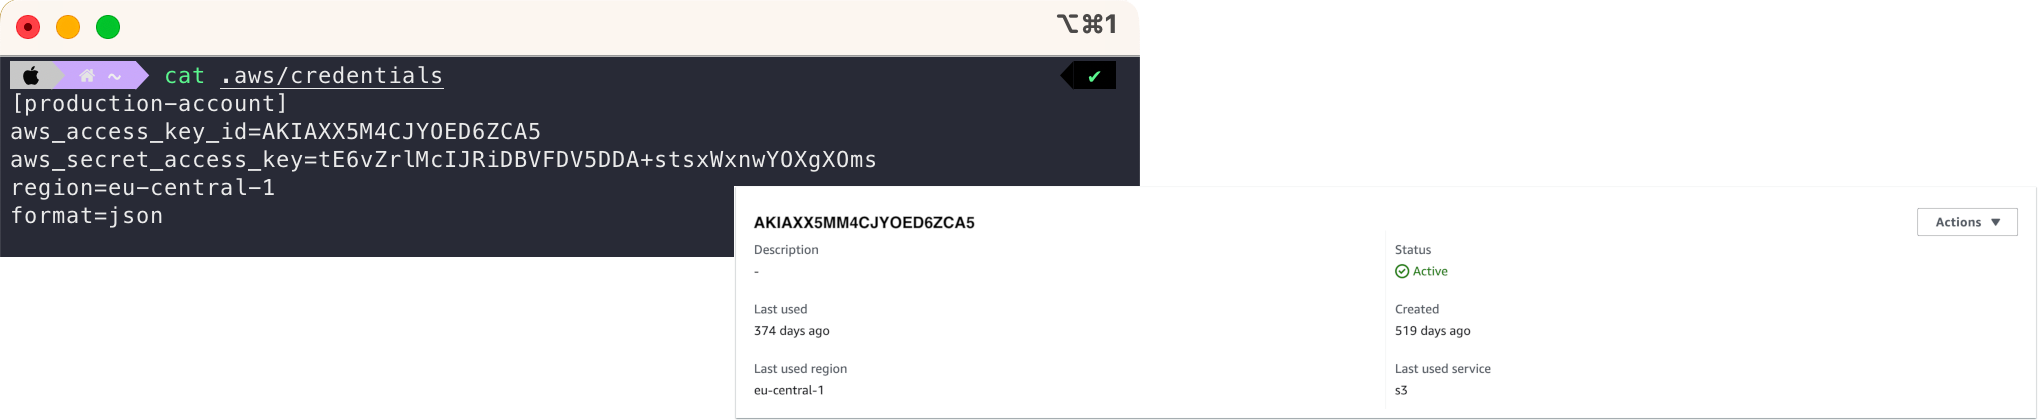
Permanent access credentials of an IAM user stored in the local .aws/credentials file stored on the local workstation! 😱 Often not traceable from the other side when logged into the AWS browser console, making it nearly impossible to determine to whom or what these credentials belong.
Even worse, maybe a whole list of credentials with access to numerous accounts in the file! 😱😱
While this example may not depict the absolute worst possible scenario for storing credentials, it does highlight significant concerns associated with permanent access credentials, as outlined in the AWS documentation. The main issue is that these credentials do not expire, leaving them vulnerable to misuse if accidentally exposed. This exposure could occur in various situations, such as during a screensharing session that is being recorded, if displayed unmasked in deployment log outputs, or due to an unlocked computer screen in an office setting. Daily situation every developer knows well.
IAM Identity Center is the better alternative
I’d always recommend the IAM Identity Center (former called AWS SSO) which requires a few more upfront configuration compared to the classic basic auth with IAM user access keys. However it will give your organization a lot benefits over the long run. The IAM Identity Center setup let’s you make use of a 3rd party identity provider which in most big organizations is already available.
Why is it much better?
- 🔌👩💻 Like the name suggests: Single sign on (SSO). Login once to access multiple accounts. It avoids technical debt at an early stage by reducing manual work to create and maintain users in every AWS account
- 🤝📑 Separation of concerns. The Identity Center manages access to your different AWS resources while all tasks related to managing the users (password policies, MFA Policy, etc.) remain in responsibility of the IDP, even if you only have one AWS account.
- 🔐⏳ Higher security as it allows login with session-based temporary credentials
- 😊💻 Better developer experience (DX) by providing devs with a unified login journey.
In daily life on The Web you often see this option to “Login with Microsoft”, or “Login with Google” which can save you the time and effort to create a new user account. It follows the same principle.
The Concept

Let’s look at the general concept behind! The Identity Provider (IDP) - in our case Azure - holds information (User Credentials, MFA Policy, etc.) about the User (or Groups). Users authenticate at the IDP. The Cloud Service Provider -in our case AWS - trusts the IDP so that User can access the resources and assume the capabilities from the Cloud Service Provider.
Our Example: IDP = Azure AD

In Azure, the ‘Enterprise Application AWS SSO’ sets up a trust relationship between Azure and AWS using SAML. After establishing this relationship, any Azure user or group added to “AWS SSO” are then provisioned in the AWS Identity Center. These provisioned users and groups can be allocated to various AWS accounts associated with the AWS Organization. Within each account, users or groups are assigned one or more PermissionSet(s) in AWS. These PermissionSets correspond to IAM roles in each account, which in turn define a set of IAM policies. In short a PermissionSet is similar to the classic IAM Role; except that it can be applied across multiple AWS accounts.
Set it up!
Now it’s time to get practical. In the following we will setup the trust relationship between AWS and Azure, assign a user and then login using the aws sso subcommand in the terminal window:
Prerequisites
- In general, a supported IDP. In our example the 3rd party-identity provider will be Azure AD (For details on alternatives to Azure AD check out the list of supported IDPs).
- Access to an Azure Active Directory in the relevant Azure space where Azure AD users are managed.
- Access permission to create new Enterprise Applications
- AWS Account with AWS IAM Identity Center (AWS SSO) enabled. On the AWS-side of things, all authentication-relevant configurations are done in the AWS IAM Identity Center. In most cases, the management account hosts the IAM Identity Center. IAM Identity Center has been enabled implicitly when enabling AWS Control Tower/Landing Zone. In case you have just one AWS account no need to worry.
- A running terminal and AWS CLI installed as we will use the CLI to test our login
Setup Trust between Azure and AWS
So far I have not found an approach to automate this. Therefore the following set of steps has to be performed manually once for the initial setup of the trust-relationship in the AWS GUI and Azure GUI:
Basically, follow the steps from this screencast:
-
AWS GUI: Creation of
SAML 2.0–based providerin AWS account -
AWS GUI: Download
saml_metadata.xmlfile -
Azure GUI: Create Azure Enterprise Application with Basic SAML configuration inside your org’s Azure Subscription
-
Azure GUI: Upload xml metadata from AWS IAM Identity Center
-
Azure GUI: Download
AWS SSO.xmlfrom Azure Portal -
AWS GUI: Upload
AWS SSO.xmlto AWS IAM Identity Center -
Azure GUI: Copy SCIM Token from AWS and paste into Azure
-
Azure GUI: Assign User(s) and/or group(s) to the AWS SSO Enterprise Application
-
Azure GUI: Provision! User(s) and/or group(s) assigned to AWS SSO organization in AWS account will get provisioned
-
Now switch to your Terminal! We will configure the AWS CLI use your Azure AD credentials. Type
aws configure ssoand fill in the values for your organizations’ AWS environment:aws configure sso SSO start URL [https://<your-access-portal-alias>.awsapps.com/start]: SSO Region [eu-central-1]: The only AWS account available to you is: 123456789010 Using the account ID 123456789010 There are 2 roles available to you. Using the role name "AdministratorAccess" CLI default client Region [eu-central-1]: CLI default output format [json]: To use this profile, specify the profile name using --profile, as shown: aws s3 ls --profile <your-profile-name> -
Congrats! 🥳 You have set up the trust relationship which lets you now allow user access AWS resources based on there Microsoft Azure User Credentials.
Use it!
Login to terminal with temporary credentials!
aws sso login --profile <your-profile-name>
A browser window will open and the terminal will produce the following output:
Attempting to automatically open the SSO authorization page in your default browser.
If the browser does not open or you wish to use a different device to authorize this request, open the following URL:

https://device.sso.eu-central-1.amazonaws.com/

Then enter the code:

XXXX-XXXX
Confirm with clicking the “Allow” button after comparing the code in the browser window with the ones in your terminal window. Output should be the following:
Successfully logged into Start URL: https://<your-access-portal-alias>.awsapps.com/start
Verify the successful login!
Export the profile
export AWS_PROFILE=<your-profile-name>
and output your current identity!
aws sts get-caller-identity
Output should look similar to this:
{
    "UserId": "AROAXX5M4CJXXXXYYYY:john.doe@your-org.com",
    "Account": "12345678910",
    "Arn": "arn:aws:sts::12345678910:assumed-role/AWSReservedSSO_AdministratorAccess_a9d891244slass/demo@myemail.com"
}
Note: Your current user session composed of three things: The users email from the ADD, the aws account number and permissionSet - in this case Administrator Access - is shown. This means whenever you want to change any of those you have to configure a new (session) profile and repeat the step 10 with the “aws configure command”.
You are now logged into the AWS Account in your current terminal session using temporary credentials and can access all resources according to your attached permission set.
Congrats! 🥳 Happy AWS securely logging in.